Project Log - Historic Restoration - Updated 10/28/2017
Well, it took a few years, but the great folks at Mount St. Mary's got back to me and I've been contracted to restore the entrance. Mount St. Marys’ Condominiums in Hooksett, NH is a 100-year-old building with historical significance. It has been a Monastery, a College and is now Condominiums.


So the temp entry is finished and now I can start working on the doors. The first step will be to remove the old finish and the rotted wood to determine what I actually have to work with. Stay tuned, this will be interesting.
Well, I've been a busy guy and haven't been real good about updating.
The first step was to remove the hardware. Normally I'd have removed the glass, but the local statutes would require replacing it with safety glass if it's removed. So, all of the glass throughout the project will be worked around.
Below is one of the doors after sanding off the finish. The discoloration is due to moisture in the wood. I cover the affected parts with cat litter for about a week and was able to suck out enough of the moisture that I could work with it.
While that was going on I removed the trim around the bottom panel because it was completely rotted. I had to mill it myself, as no one had anything close as a stock item.


My task will be to restore the entrance to the original color and finish. I had to research a number of other buldings in the Boston area by the same architect (T. Edward Sheehan) to validate the original color and finish. The project will begin this summer with the doors. They are 2" thick and solid oak. The remainder is planned for the summer of 2018.

The entrance has been neglected for many years and the wood is severaly weathered. Still, it's a towering and grand entrance way. I'm really excited to be working on it.

Here's a look at the weathering

I'll be starting this one in Mid-June. It will be worth following.
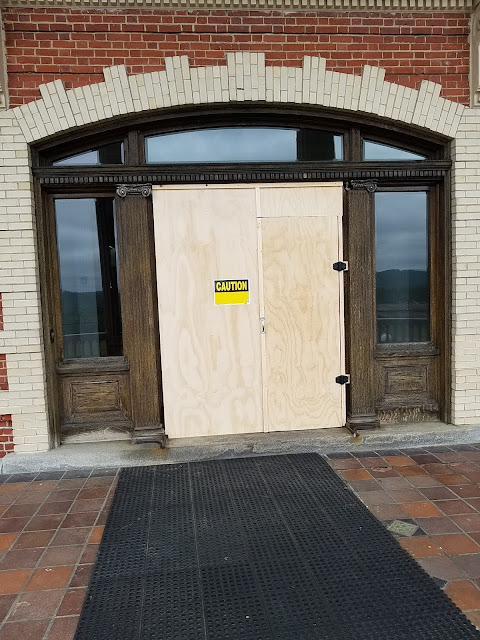
THE JOB BEGINS
On June 17th we started around 8:30 by pulling the doors. Once we had those removed and loaded in my truck we needed to build a temporary enclosure to protect the vestibule while I have the doors in my shop.


So the temp entry is finished and now I can start working on the doors. The first step will be to remove the old finish and the rotted wood to determine what I actually have to work with. Stay tuned, this will be interesting.

Well, I've been a busy guy and haven't been real good about updating.
The first step was to remove the hardware. Normally I'd have removed the glass, but the local statutes would require replacing it with safety glass if it's removed. So, all of the glass throughout the project will be worked around.
Below is one of the doors after sanding off the finish. The discoloration is due to moisture in the wood. I cover the affected parts with cat litter for about a week and was able to suck out enough of the moisture that I could work with it.
While that was going on I removed the trim around the bottom panel because it was completely rotted. I had to mill it myself, as no one had anything close as a stock item.

Tedium, thy name is sanding small decorative pieces. Argh. One of them was broken and I had to repair it. I think it was the one you can see just past my hand with the block glued in place. In the next picture I can't tell which one it was. Can you?


After all of the repairs were done and the trim was put in place the wood was stained and varnished. I used 5 coats of spar on the outer surfaces. The inner surfaces did not need refinishing so they were touched up and resurfaced.

After varnishing and polishing, I polished up the brass and reattached all of the hardware.

Finally, it was installation day. The difference between the doors and the surrounding entranceway is pretty dramatic. The remainder is scheduled to begin next spring.

The end of a big job

See you next spring . . .


Comments