Posts

Showing posts from 2011

Dining Room Set Complete

Image
The work in progress dining room set is done and delivered. 

Vanity Conversion Update

Image
The Vanity in Place Remeber the vanity I was rebuilding a while back.  Well here it is with the plumbing attached.

Insurance Work -- Bureau Repair

Image
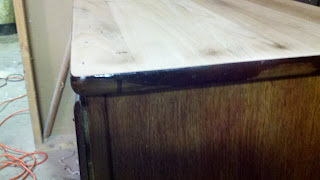
Sometimes you have to fight your instincts and just do what is required.  This bureau is an example of that.  During a move, the piece was damaged by impacts to one of the drawers and by duct tape being applied to the finish on top.  The duct tape neatly removed a 2" by 6 inch swath of finish, exposing the base stain below. Unfortunately, I can't find the before picture showing the damage.  More interesting was the type of finish that was removed.  Again, I'm dealing with Minwax Colored Polyurethane, grrrrrr.  In this case, someone did a quick brush-up, with little or no surface prep and only one side was actually finished.  The picture below illustrates the quality of the finish I was trying to match and the unfinished side.  NO, I am not responsible for the over-brush and drip on the side of the top.   I wasn't about to spend hours trying to match a seamless fix on a square-edged damaged spot on this quality of finish, so step 1 was to sand off the old finish and pr

Vanity Conversion

Image
This piece was damaged in a fire and was soaked and warped.  The particle board construction was separating and it was pretty much ready for the scrap heap, but the owner has an emotional attachment, so we decided to rebuild it, using as much of the original piece as possible. Here's the end result:

NIcked up Frame

Image
This mirror frame had a few large gouges through the antique bronze finish into the substrate wood.  There was also some significant build up of dust, old wax, and lord knows what else.  I scrubbed that out with some citrus degreaser and restored the finish with some ebony stain and a quick wipe.  Then, I filled the gouges with melt-in lacquer.   After that a polish and waxing and presto! BEFORE:   AFTER:

Gouges in a Cherry Bookcase

Image
Another moving tragedy.  These gouges were on top of this nice piece and really ugly. I had to do this one on-site, but it came out pretty well.

Deep Surface Scratches

Image
This dresser suffered a number of serious scratches during a move.  Because it was particle board construction no sanding was possible. Still I think this turned out pretty well. Before:  AFTER:

Lutherie

Image
Yes, I work on instruments, too.  This 1962 Gibson "Dove" had a serious surface scratch on the lower bout and numerous heavy pick scratches and "dings" from rough use over the years.  I'm pretty happy with the results on this one. Before:  After:

New Grips

Image
The grips on this .22 single action pistol were plastic and too small.  I replaced the cheap plastic grips with hand-sculpted, black walnut grips, custom fit to the owner's hand

Writing Desk

Image
I was tasked with repairing a deep gouge in the edge molding of a mahogany-stain over oak veneer writing desk.  The gouge was a little over an inch long and perhaps 1/16" -  3/8" wide.  I judged the gouge too large to fill effectively with burn-in lacquer, so I went with a died wood filler and then padded the finish to cover the patch.  I finished with a light buffing and added the artificial distressing over the fix. It's worth pointing out that the before picture was taken in natural sunlight and the after under fluorescent light.  Hence the differences in overall tone of the pictures.

By Way of Introduction . . .

Image
Greetings, Welcome to my blog.  I've been working with wood, building and repairing furniture and doing cabinetry and finish carpentry for the last 40 years or so, beginning with a block sander and a vast mesa of cherry that was the top of a dining room table.  I learned to hate sanding . . . and then I learned to love it.  Now, decades later, I'm doing the same stuff I've always done for friends and relatives, informal side work and personal use into a business.  I'm not quite ready to give up my day job, but maybe . . . some day.  In the meantime, as a way to document my work for reference and maybe gain a little web presence, I'm going to try to maintain this blog. How do you like my new cards? Wish me luck.