Posts

Scratched Bed Footboard

Image
This started out as a repair job for some damage caused by a local cleaning service.  There were a number of scratches and scuffs caused by a poorly managed vacuum cleaner hose, but the owner wanted the whole piece resurfaced, so be it.  I began with an overall wet sanding using 3000 grit, just to determine what I had to deal with.  Once the surface was roughed and cleaned, I started analyzing the damage.  There were literally hundreds of small scratches.  Even if I had the time to fill each of these individually, it would have looked terrible with all of those tiny patches. The pieces on either side illustrate the type of damage I had to work with.  Differences in tone have to do with lighting.  The coloring was consistent.  I was able to use a light pecan stain to repair the scratches that actually exposed the wood below the finish.  The rest I filled with several coats of varnish and then sanded them flat and buffed them to smooth...

Custom Air Hockey Hammer

Image
A friend plays a lot of air hockey, so I thought it would be cool for him to have a custom air hockey hammer (that's what they call the thing you hit the puck with, I thought it was a paddle.  Live and learn, eh?) Like any turning project this started with selecting the stock, so I picked through my scrap pile and found a bunch of old chunks of black walnut.  I squared them up and sanded the faces flat (too small to put through the planer).  Then I glued and clamped the stock . . . The next day I squared up the stock and cut it into an octagon for turning on the bandsaw. I love turning wood!!! Here's the stock after coming off the lathe Now the first coat of varnish Then I customized it with  a stylized "J" and added multiple coats of varnish to protect the wood from the repeated impact of air hockey. Nothing left to do, but put some felt on the bottom and take it to the table!

Dining Room Set Complete

Image
The work in progress dining room set is done and delivered. 

Vanity Conversion Update

Image
The Vanity in Place Remeber the vanity I was rebuilding a while back.  Well here it is with the plumbing attached.

Insurance Work -- Bureau Repair

Image
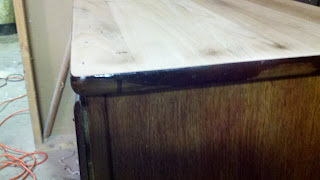
Sometimes you have to fight your instincts and just do what is required.  This bureau is an example of that.  During a move, the piece was damaged by impacts to one of the drawers and by duct tape being applied to the finish on top.  The duct tape neatly removed a 2" by 6 inch swath of finish, exposing the base stain below. Unfortunately, I can't find the before picture showing the damage.  More interesting was the type of finish that was removed.  Again, I'm dealing with Minwax Colored Polyurethane, grrrrrr.  In this case, someone did a quick brush-up, with little or no surface prep and only one side was actually finished.  The picture below illustrates the quality of the finish I was trying to match and the unfinished side.  NO, I am not responsible for the over-brush and drip on the side of the top.   I wasn't about to spend hours trying to match a seamless fix on a square-edged damaged spot on this quality of finish, so step 1 was t...

Vanity Conversion

Image
This piece was damaged in a fire and was soaked and warped.  The particle board construction was separating and it was pretty much ready for the scrap heap, but the owner has an emotional attachment, so we decided to rebuild it, using as much of the original piece as possible. Here's the end result:

NIcked up Frame

Image
This mirror frame had a few large gouges through the antique bronze finish into the substrate wood.  There was also some significant build up of dust, old wax, and lord knows what else.  I scrubbed that out with some citrus degreaser and restored the finish with some ebony stain and a quick wipe.  Then, I filled the gouges with melt-in lacquer.   After that a polish and waxing and presto! BEFORE:   AFTER: